> ## Documentation Index
> Fetch the complete documentation index at: https://developer.box.com/llms.txt
> Use this file to discover all available pages before exploring further.

# Get started with AI Studio

> Set up a platform app and authenticate to start creating custom AI agents with the Box AI Studio API.

export const MultiRelatedLinks = ({sections = []}) => {
  if (!sections || sections.length === 0) {
    return null;
  }
  return <div className="space-y-8">
      {sections.map((section, index) => <RelatedLinks key={index} title={section.title} items={section.items} />)}
    </div>;
};

export const RelatedLinks = ({title, items = []}) => {
  const getBadgeClass = badge => {
    if (!badge) return "badge-default";
    const badgeType = badge.toLowerCase().replace(/\s+/g, "-");
    return `badge-${badge === "ガイド" ? "guide" : badgeType}`;
  };
  if (!items || items.length === 0) {
    return null;
  }
  return <div className="my-8">
      {}
      <h3 className="text-sm font-bold uppercase tracking-wider mb-4">{title}</h3>

      {}
      <div className="flex flex-col gap-3">
        {items.map((item, index) => <a key={index} href={item.href} className="py-2 px-3 rounded related_link hover:bg-[#f2f2f2] dark:hover:bg-[#111827] flex items-center gap-3 group no-underline hover:no-underline border-b-0">
            {}
            <span className={`px-2 py-1 rounded-full text-xs font-semibold uppercase tracking-wide flex-shrink-0 ${getBadgeClass(item.badge)}`}>
              {item.badge}
            </span>

            {}
            <span className="text-base">{item.label}</span>
          </a>)}
      </div>
    </div>;
};

export const Link = ({href, children, className, ...props}) => {
  const localizedHref = localizeLink(href);
  return <a href={localizedHref} className={className} {...props}>
      {children}
    </a>;
};

<Warning>
  Box AI Studio is available only for Enterprise Advanced accounts.
</Warning>

To create custom AI agents with AI Studio, you need a platform application with the Box AI scope enabled and a token to authenticate your API calls.

<Note>
  The setup steps below are similar to the <Link href="/guides/box-ai/ai-tutorials/prerequisites">Box AI API prerequisites</Link>. If you have already completed those steps, confirm that the **Manage AI** scope is enabled and that your admin has enabled AI Studio, then skip ahead to [next steps](#next-steps).
</Note>

<Steps>
  <Step title="Create a platform application">
    Create a platform application to make API calls. Follow the guide on <Link href="/guides/applications/platform-apps/create">creating platform apps</Link>.
  </Step>

  <Step title="Enable AI Studio">
    Ask a Box admin to enable AI Studio in the Admin Console. For admin instructions, see [Enabling Box AI Studio and Managing Agents][enable].
  </Step>

  <Step title="Add the AI scope">
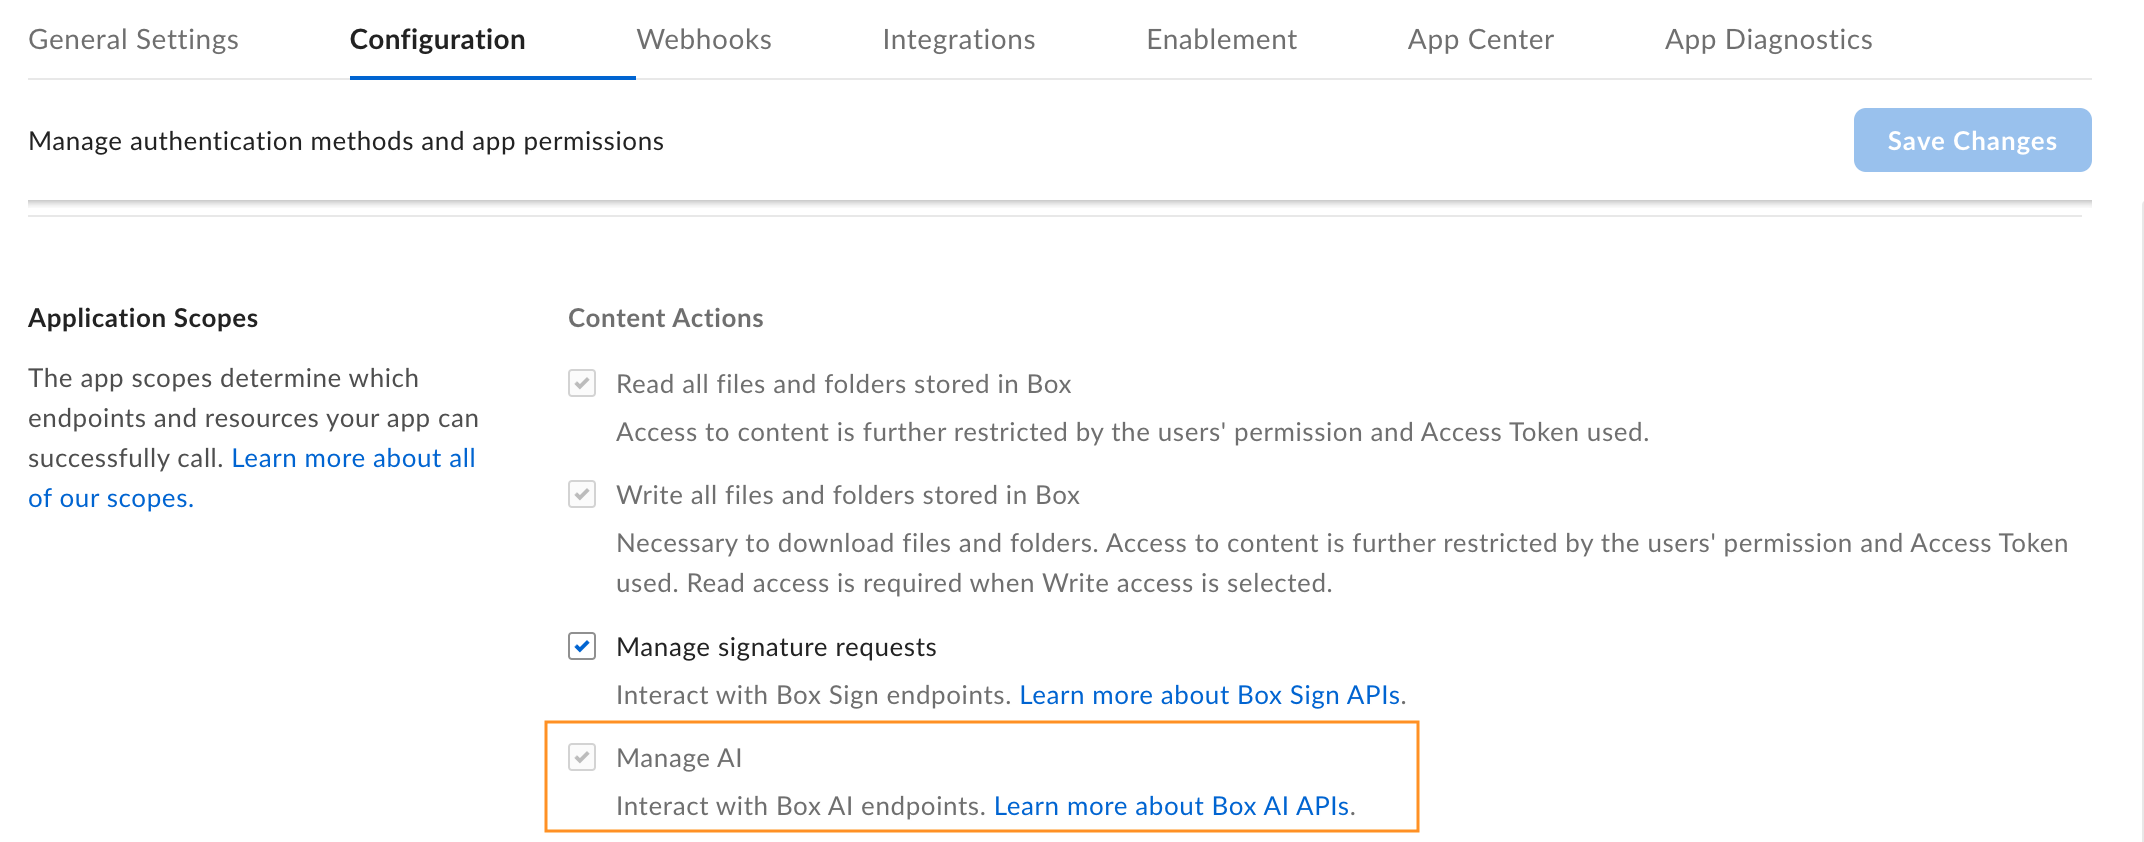
    To interact with the Box AI API, add the `ai.readwrite` <Link href="/guides/api-calls/permissions-and-errors/scopes">scope</Link> to your application.

    1. Open your application in the Developer Console.
    2. Go to **Configuration** > **Required Access Scopes** > **Content Actions**.
    3. Select **Manage AI**.

    <Frame>
      <img src="https://mintcdn.com/box/Z1XcLZTI-opBQvuM/images/guides/ai-studio/box-ai-app-scopes.png?fit=max&auto=format&n=Z1XcLZTI-opBQvuM&q=85&s=3a247bbcee4adfdaeb6e1d793dd927af" alt="box ai scopes" width="2144" height="842" data-path="images/guides/ai-studio/box-ai-app-scopes.png" />
    </Frame>

    <Note>
      If you do not see the **Manage AI** option, contact your admin to grant access to the Box AI API.
      If you see the scope checked and grayed out, the app owner has it enabled but you cannot change the setting.
    </Note>
  </Step>

  <Step title="Authorize the application">
    Submit your app for <Link href="/guides/authorization">authorization or enablement</Link>. If you are enabling Box AI for an existing application, you must <Link href="/guides/authorization/platform-app-approval#re-authorization-on-changes">re-authorize</Link> it.
  </Step>

  <Step title="Generate a developer token">
    Generate a developer token to authenticate your requests.

    1. Go to **Developer Console** > **My Platform Apps**.
    2. Hover over a platform app and select the **Options menu** button (...) on the right.
    3. Select **Generate Developer Token**. The token is automatically copied to your clipboard.

    <Warning>
      A developer token is only valid for one hour. In production, use your app's configured authentication method (for example, <Link href="/guides/authentication/oauth2">OAuth 2.0</Link> or <Link href="/guides/authentication/client-credentials">Client Credentials Grant</Link>).
    </Warning>

    For more details, see <Link href="/guides/authentication/tokens/developer-tokens">developer tokens</Link>.
  </Step>
</Steps>

## Next steps

With your application configured and a token generated, you can start creating custom AI agents. Use cURL, Postman, or any of the <Link href="/sdks-and-tools">Box SDKs</Link> to make API calls.

<CardGroup cols={2}>
  <Card title="Create an agent" icon="robot" href={localizeLink("/guides/ai-studio/ai-studio-agents/create-agents")} arrow="true">
    Define a custom AI agent with specific capabilities and access controls.
  </Card>

  <Card title="List agents" icon="list" href={localizeLink("/guides/ai-studio/ai-studio-agents/get-agents")} arrow="true">
    Retrieve all AI agents in your enterprise.
  </Card>
</CardGroup>

[enable]: https://support.box.com/hc/en-us/articles/37228079461267-Enabling-Box-AI-Studio-and-Managing-Agents/#h_01JH9HAMP43YYN6VWM51QCK413
