> ## Documentation Index
> Fetch the complete documentation index at: https://developer.box.com/llms.txt
> Use this file to discover all available pages before exploring further.
# Box CLI with JWT Authentication
export const MultiRelatedLinks = ({sections = []}) => {
if (!sections || sections.length === 0) {
return null;
}
return
{sections.map((section, index) => )}
;
};
export const RelatedLinks = ({title, items = []}) => {
const getBadgeClass = badge => {
if (!badge) return "badge-default";
const badgeType = badge.toLowerCase().replace(/\s+/g, "-");
return `badge-${badge === "ガイド" ? "guide" : badgeType}`;
};
if (!items || items.length === 0) {
return null;
}
return ;
};
export const Link = ({href, children, className, ...props}) => {
const localizedHref = localizeLink(href);
return
{children}
;
};
Previously, our Box CLI Quick Start Guide, followed the JWT or server
authentication application setup flow. Since we released a new OAuth 2.0
version of the Box CLI, we updated it to use the new feature. We migrated
the original JWT setup instructions here, in case you would still like
to use the server authentication application type.
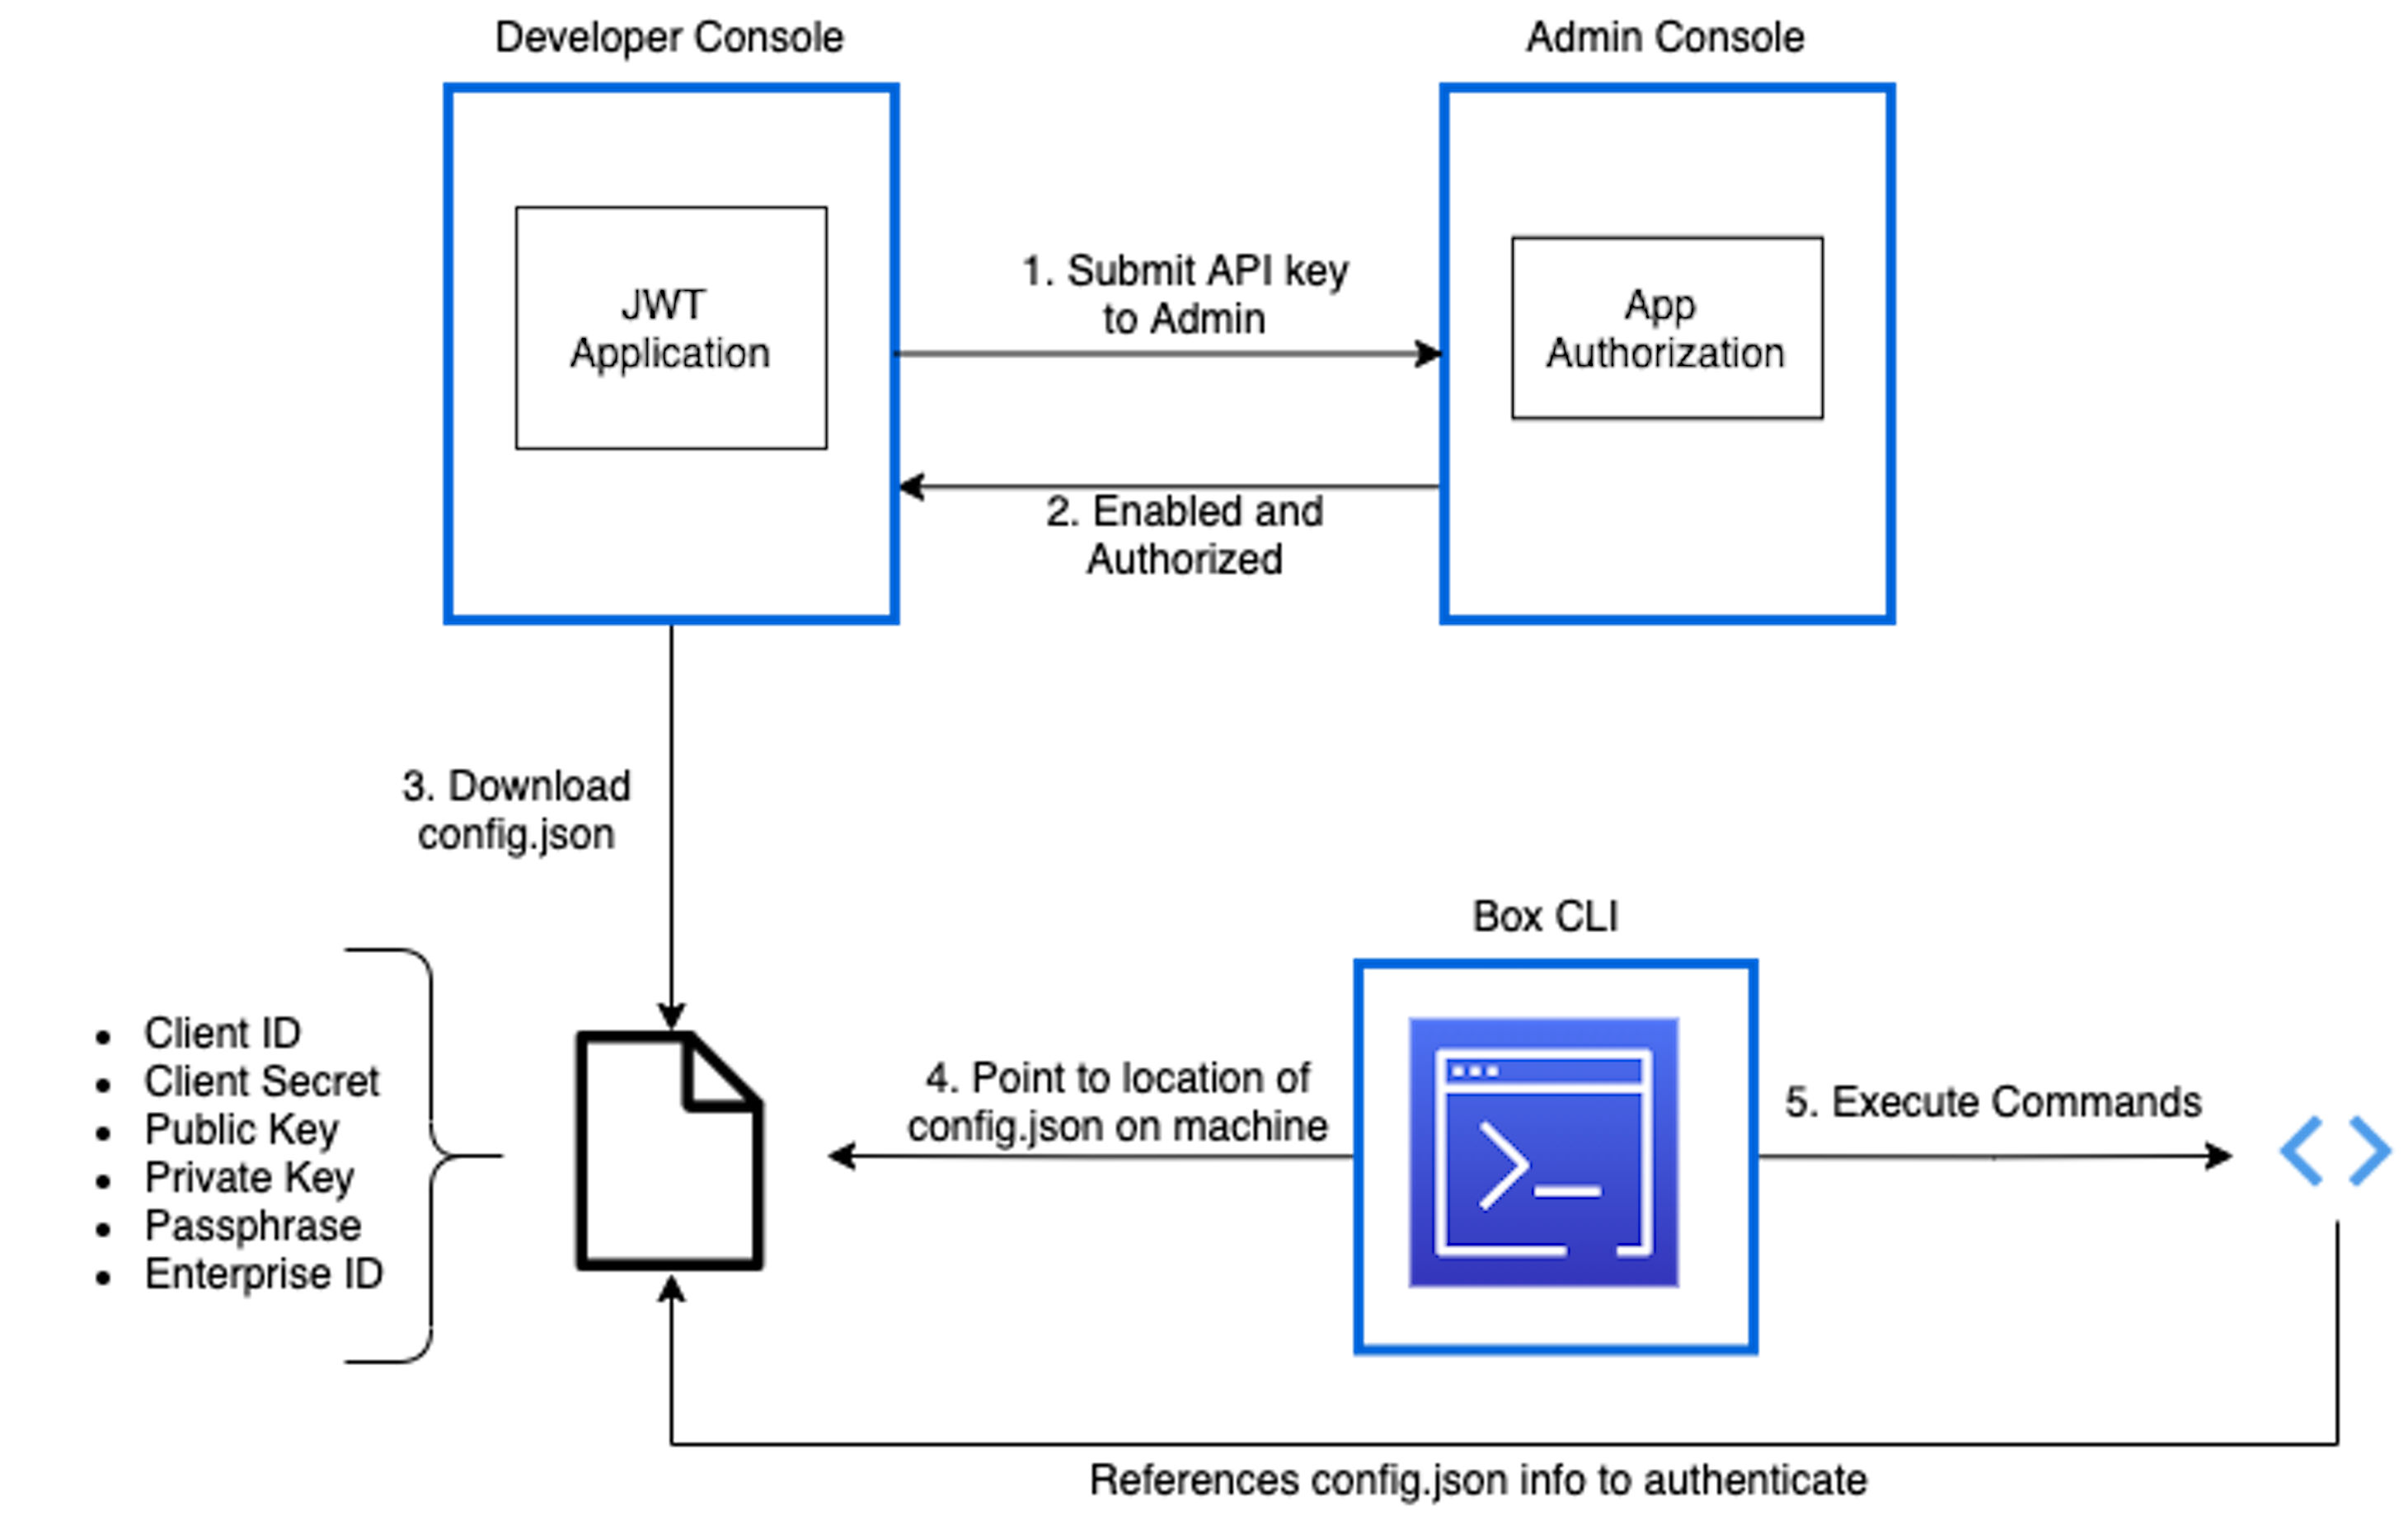
## Setup a JWT application
The first step to using the CLI with server authentication is creating a Box
application in the
[Developer Console][dc], which the CLI can use behind the scenes to make API
calls. If you would like to associate your CLI with an existing JWT application
you can skip this step. However, you will want to ensure that, at a minimum, the
following scopes are set in the **Configuration** tab of your application:
* Read all files and folders stored in Box
* Write all files and folders stored in Box
1. From the left-hand navigation panel on your All Files page, open the [Developer Console][dc]. If this is your first time using the Box API and this option is not already available, you can add it to your account by clicking [here][dc].
2. Click **Create Platform App** > **Platform App** > **Server Authentication (with JWT)** > name the application > **Create App**
Server Authentication (with JWT) always requires Admin authorization before use.
## Configure the application
This brings you to the application's configuration page where you need to
choose its access and permissions. Again, keep in mind that because of the
application's authentication type, it requires Admin approval.
At a minimum, you need the following scopes:
* Read all files and folders stored in Box
* Write all files and folders stored in Box
You can choose either App Access Only or App + Enterprise Access as the
application access.
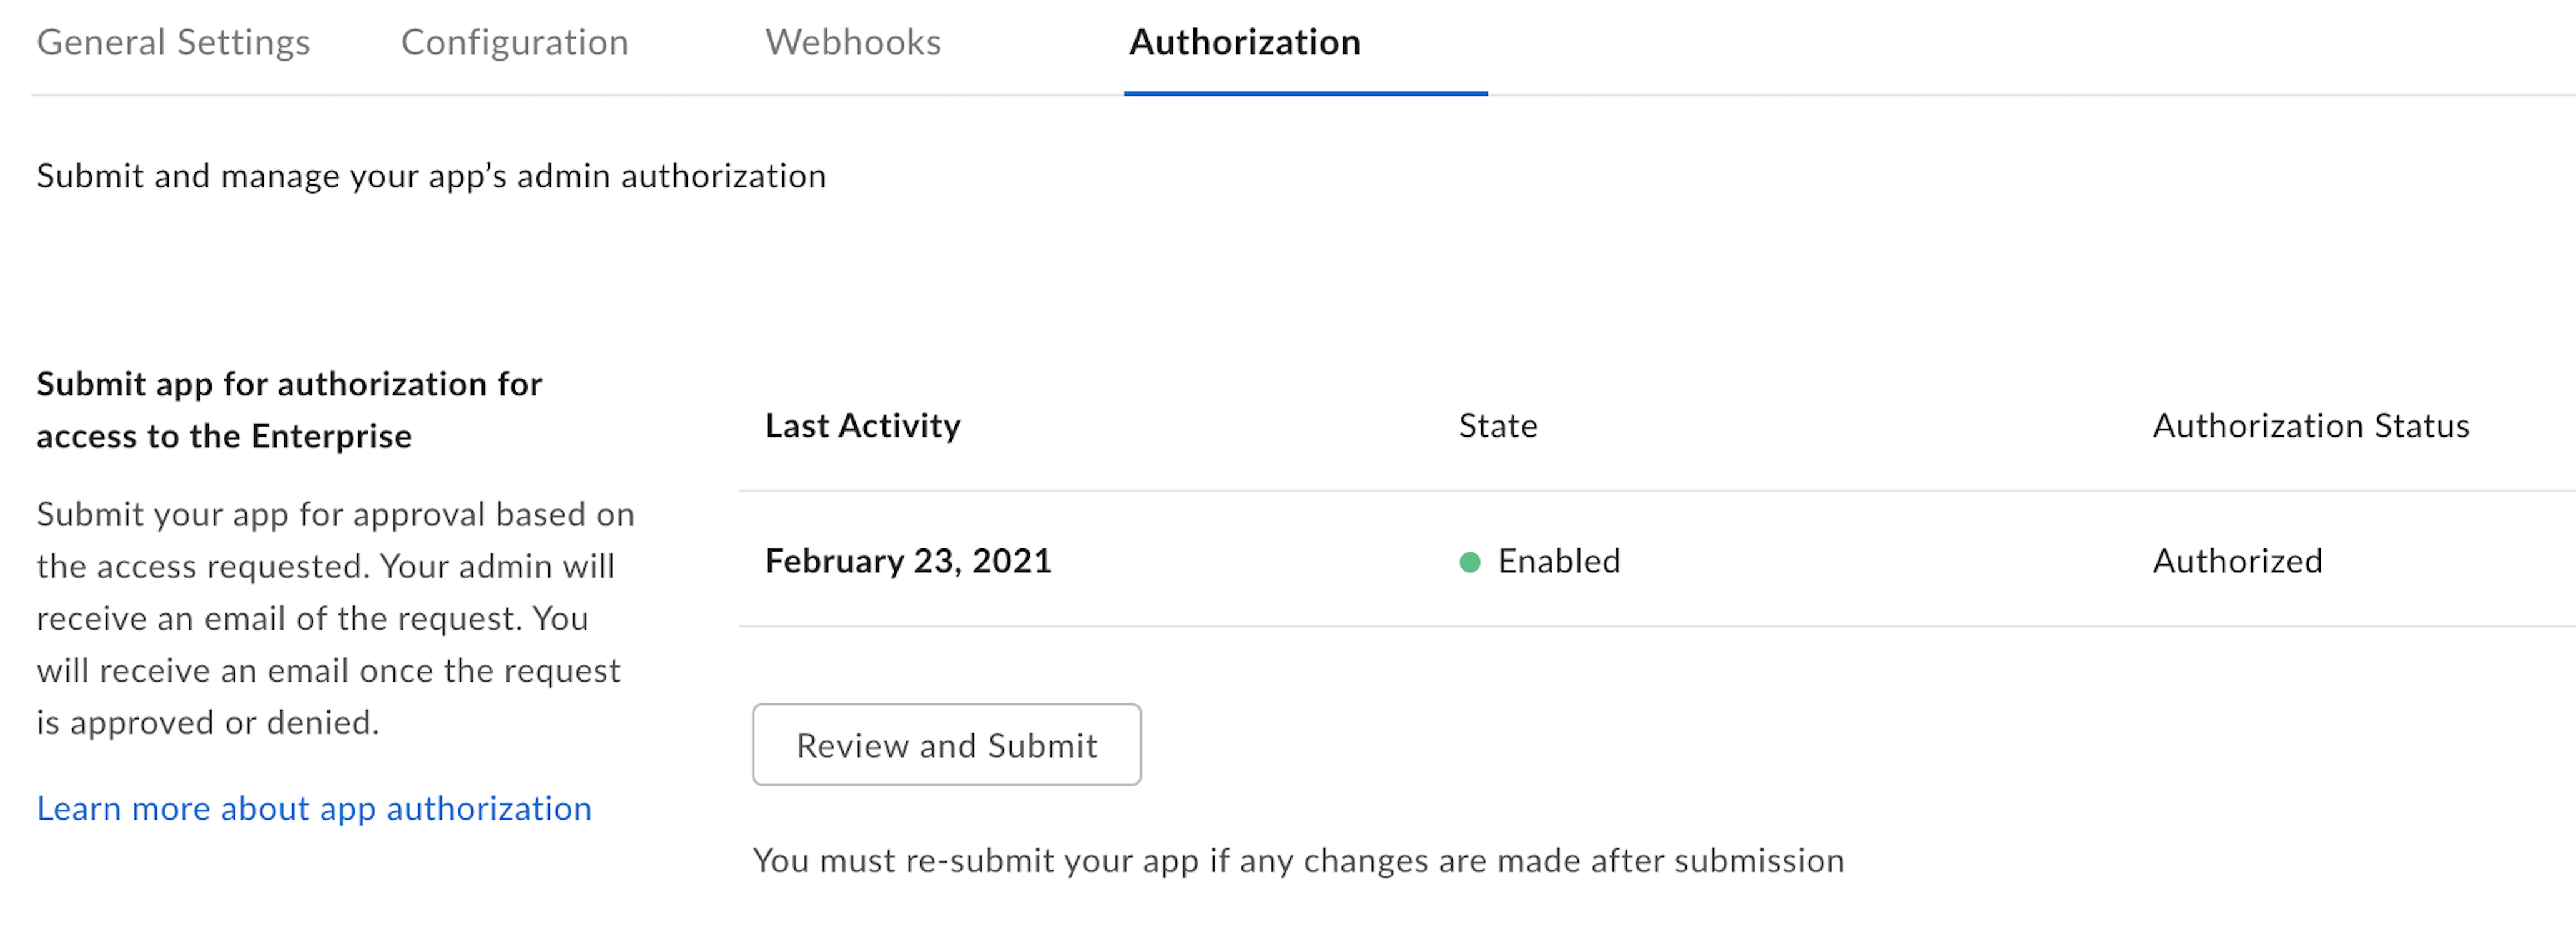
## Authorize the application
All applications leveraging Server Authentication must be authorized in the
Admin Console before making successful API calls. This is because all JWT
applications have a Service Account, which, based on the applications
scopes, may be able to perform Admin actions.
Steps for developers and Admins can be found in our authorization guide.
If you would like more information on how scopes, application access, tokens,
and permissions work together, please see our article on understanding
[Box's security mechanisms][blogpost].
If configuration changes are made to this application, it will need to be
reauthorized in order for the changes to take effect.
You will know when an application is ready for use by visiting its Authorization
tab in the [Developer Console][dc]. The state and status must be enabled and
authorized.
 ## Download Required Data
The CLI needs a configuration file stored locally in order to make API calls.
To download the configuration file, visit the **Configuration** tab in the
[Developer Console][dc]. Click **Generate a Public/Private Keypair**, which will
send you through 2FA verification before automatically downloading the
configuration file for your application. For more information see
our guide.
For security reasons 2FA must be enabled on your Box account to successfully
generate a public/private keypair.
Locate the downloaded file on your machine which has a default name in the
format: `EnterpriseID_publicKeyID_config.json`. You may leave this name or
choose to rename it. This guide assumes the file is renamed to `config.json`.
It is critical you place the file in a location where it will not be
inadvertently deleted or moved. If this occurs you will need to repeat the
step 2 to reconfigure the CLI.
## CLI Installation and Configuration
The CLI can be installed as a Node package on any platform,
including Linux. For this to work you will need to have
[Node JS](https://nodejs.org/) installed on your machine.
```bash theme={null}
npm install --global @box/cli
```
## Source Code
The source code for the CLI is available via [GitHub][cli].
## Run configuration command
You will now need to configure the CLI to point to to the configuration file
downloaded in step 1.
Open your terminal or command line and execute the
command: `box configure:environments:add PathToConfigFileHere`, replacing
`PathToConfigHere` with the path to your `config.json` file.
For example:
`box configure:environments:add /Users/ExampleUser/Documents/CLI/config.json`
You can drag the csv file from the Finder/File Explorer to the
terminal/command line window to auto-populate the path.
## Confirm configuration
To confirm successful configuration, use the command `box users:get`.
A successful response will provide details about the Service Account user
associated with your Access Token:
```json theme={null}
Type: user
ID: ''0123456789''
Name: Box CLI - Quickstart Example
Login: AutomationUser_123456_8jSo6Lqvko@boxdevedition.com
Created At: '2020-01-01T09:45:01-07:00'
Modified At: '2021-03-01T09:30:05-07:00'
Language: en
Timezone: America/Los_Angeles
Space Amount: 999999999999999
Space Used: 6291500
Max Upload Size: 16106127360
Status: active
Job Title: ''
Phone: ''
Address: example+user@box.com
Avatar URL: ''
Notification Email: []
```
By default, JWT applications automatically obtain an Access Token for the
Service Account. It is possible to change the default user, but this guide
assumes you do not do this.
## Next Steps
* You can checkout the [commands][commands] page on GitHub for example code.
* You can also go to the second part of the OAuth 2.0 Quick Start for a tutorial on how to use the commands.
[cli]: https://github.com/box/boxcli
[auth]: /guides/authentication/jwt/without-sdk
[dc]: https://account.box.com/developers/console
{/* i18n-enable localize-links */}
[blogpost]: https://medium.com/box-developer-blog/box-api-understanding-security-9fcad7b1d72e
[four]: /guides/cli/quick-start/using-bulk-commands
[cache]: https://github.com/box/boxcli/blob/master/docs/configure.md#box-configureenvironmentsupdate-name
[ac]: https://github.com/box/boxcli/blob/master/docs/autocomplete.md
[commands]: https://github.com/box/boxcli#command-topics
## Download Required Data
The CLI needs a configuration file stored locally in order to make API calls.
To download the configuration file, visit the **Configuration** tab in the
[Developer Console][dc]. Click **Generate a Public/Private Keypair**, which will
send you through 2FA verification before automatically downloading the
configuration file for your application. For more information see
our guide.
For security reasons 2FA must be enabled on your Box account to successfully
generate a public/private keypair.
Locate the downloaded file on your machine which has a default name in the
format: `EnterpriseID_publicKeyID_config.json`. You may leave this name or
choose to rename it. This guide assumes the file is renamed to `config.json`.
It is critical you place the file in a location where it will not be
inadvertently deleted or moved. If this occurs you will need to repeat the
step 2 to reconfigure the CLI.
## CLI Installation and Configuration
The CLI can be installed as a Node package on any platform,
including Linux. For this to work you will need to have
[Node JS](https://nodejs.org/) installed on your machine.
```bash theme={null}
npm install --global @box/cli
```
## Source Code
The source code for the CLI is available via [GitHub][cli].
## Run configuration command
You will now need to configure the CLI to point to to the configuration file
downloaded in step 1.
Open your terminal or command line and execute the
command: `box configure:environments:add PathToConfigFileHere`, replacing
`PathToConfigHere` with the path to your `config.json` file.
For example:
`box configure:environments:add /Users/ExampleUser/Documents/CLI/config.json`
You can drag the csv file from the Finder/File Explorer to the
terminal/command line window to auto-populate the path.
## Confirm configuration
To confirm successful configuration, use the command `box users:get`.
A successful response will provide details about the Service Account user
associated with your Access Token:
```json theme={null}
Type: user
ID: ''0123456789''
Name: Box CLI - Quickstart Example
Login: AutomationUser_123456_8jSo6Lqvko@boxdevedition.com
Created At: '2020-01-01T09:45:01-07:00'
Modified At: '2021-03-01T09:30:05-07:00'
Language: en
Timezone: America/Los_Angeles
Space Amount: 999999999999999
Space Used: 6291500
Max Upload Size: 16106127360
Status: active
Job Title: ''
Phone: ''
Address: example+user@box.com
Avatar URL: ''
Notification Email: []
```
By default, JWT applications automatically obtain an Access Token for the
Service Account. It is possible to change the default user, but this guide
assumes you do not do this.
## Next Steps
* You can checkout the [commands][commands] page on GitHub for example code.
* You can also go to the second part of the OAuth 2.0 Quick Start for a tutorial on how to use the commands.
[cli]: https://github.com/box/boxcli
[auth]: /guides/authentication/jwt/without-sdk
[dc]: https://account.box.com/developers/console
{/* i18n-enable localize-links */}
[blogpost]: https://medium.com/box-developer-blog/box-api-understanding-security-9fcad7b1d72e
[four]: /guides/cli/quick-start/using-bulk-commands
[cache]: https://github.com/box/boxcli/blob/master/docs/configure.md#box-configureenvironmentsupdate-name
[ac]: https://github.com/box/boxcli/blob/master/docs/autocomplete.md
[commands]: https://github.com/box/boxcli#command-topics