> ## Documentation Index
> Fetch the complete documentation index at: https://developer.box.com/llms.txt
> Use this file to discover all available pages before exploring further.

> BoxコンテンツをWeaviateに埋め込み、Weaviate Query Agentによるクエリを実行することで、エンドツーエンドのRAGワークフローを構築します。

# BoxとWeaviate

export const RelatedLinks = ({title, items = []}) => {
  const getBadgeClass = badge => {
    if (!badge) return "badge-default";
    const badgeType = badge.toLowerCase().replace(/\s+/g, "-");
    return `badge-${badge === "ガイド" ? "guide" : badgeType}`;
  };
  if (!items || items.length === 0) {
    return null;
  }
  return <div className="my-8">
      {}
      <h3 className="text-sm font-bold uppercase tracking-wider mb-4">{title}</h3>

      {}
      <div className="flex flex-col gap-3">
        {items.map((item, index) => <a key={index} href={item.href} className="py-2 px-3 rounded related_link hover:bg-[#f2f2f2] dark:hover:bg-[#111827] flex items-center gap-3 group no-underline hover:no-underline border-b-0">
            {}
            <span className={`px-2 py-1 rounded-full text-xs font-semibold uppercase tracking-wide flex-shrink-0 ${getBadgeClass(item.badge)}`}>
              {item.badge}
            </span>

            {}
            <span className="text-base">{item.label}</span>
          </a>)}
      </div>
    </div>;
};

export const SignupCTA = ({children}) => {
  return <div className="flex flex-wrap items-center gap-4 p-5 rounded-lg border border-gray-200 dark:border-gray-700 my-6" style={{
    background: "linear-gradient(135deg, rgba(0, 97, 213, 0.06), rgba(0, 97, 213, 0.02))"
  }}>
      <div className="flex-1 text-sm leading-relaxed text-gray-700 dark:text-gray-300" style={{
    minWidth: "280px"
  }}>
        {children}
      </div>
      <div className="flex flex-col items-center gap-2">
        <a href="https://account.box.com/signup/developer#ty9l3" className="signup-cta-button inline-flex items-center whitespace-nowrap px-5 py-2 text-sm font-semibold text-white no-underline">
          {translate("Get started for free")}
        </a>
        <a href="https://account.box.com/developers/console" className="signup-cta-login text-xs text-gray-500 dark:text-gray-400 no-underline whitespace-nowrap">
          {translate("Already have an account? Log in")}
        </a>
      </div>
    </div>;
};

このチュートリアルでは、検索拡張生成 (RAG) ワークフローの構築について説明します。そのために、Boxコンテンツを[Weaviate](https://weaviate.io/)ベクトルデータベースに埋め込んで、Weaviateの[Query Agent](https://weaviate.io/blog/weaviate-agents)を使用してデータについての質問に回答できるようにします。

フルバージョンのレシピは、[Weaviateレシピリポジトリ](https://github.com/weaviate/recipes/tree/main/integrations/data-platforms/box)でJupyter Notebookとして入手できます。

<SignupCTA>
  無料のDeveloperアカウントを作成すると、WeaviateでAIを活用したワークフローを構築するために必要なすべての機能とBox APIにアクセスできます。
</SignupCTA>

## 概要

### Weaviateとは

[Weaviate](https://weaviate.io/)は、AIを利用した高速で大規模な検索向けに構築された、オープンソースのベクトルデータベースです。データをオブジェクトとベクトルとして保存するため、埋め込みによるセマンティック検索と構造化フィルタリングを組み合わせることができます。Weaviateはクラウドネイティブかつフォールトトレラントで、大規模言語モデル (LLM) に直接統合されています。

### BoxとWeaviateでエンドツーエンドのRAGソリューションを作成する方法

RAGは、ベクトル検索 (取得) と言語モデル (生成) を組み合わせて、独自のデータを使用して質問に回答する手法です。フローは次のステップに沿って進みます。

* **コンテンツの保存**: Boxがファイル (PDF、ドキュメント、テキストレポート、サポートされるその他の形式) を保持します。
* **埋め込みの作成**: Boxファイルからテキストが抽出され、チャンク分割されます。チャンク分割されたテキストは、[Weaviate Embeddings](https://weaviate.io/developers/wcs/embeddings)を使用してベクトル埋め込みに変換されます。
* **クエリの実行**: WeaviateのQuery Agentが自然言語の質問を受け取り、必要な検索クエリと集計クエリを生成して、単一の回答を返します。これらはすべて、エージェント型RAGを使用して行われます。

## 前提条件

始める前に、以下が揃っていることを確認してください。

* Box Developerアカウント。まだ持っていない場合は、[無料のDeveloperアカウントにサインアップします](https://account.box.com/signup/developer#ty9l3)。
* Jupyter拡張機能を備えた、[Visual Studio Code](https://code.visualstudio.com/docs/datascience/jupyter-notebooks)などのJupyter Notebook環境、またはローカルのJupyterインストール。
* Weaviate Cloudアカウント。[無料のサンドボックスプランにサインアップします](https://console.weaviate.cloud/)。

## Box開発者トークンの取得

1. 右上隅にある \[**新規アプリ**] をクリックします。
2. アプリ名を入力し、認証方法として \[**OAuth 2.0**] を選択します。
3. \[**アプリの作成**] を選択します。
4. \[**アプリケーションスコープ**] で、ファイルの読み取り/書き込みスコープを追加して \[**変更を保存**] をクリックします (これらのスコープがまだ有効でない場合)。
5. \[**構成**] タブから開発者トークンをコピーして保存します。これはノートブックに必要になります。

<Note>
  開発者トークンは60分間有効です。セッションに時間がかかると、新しいトークンの生成が必要になります。
</Note>

## Weaviateクラスタの作成

1. [Weaviate Cloud](https://console.weaviate.cloud/)にログインします。
2. ダッシュボードから新しいクラスタを作成します。このクラスタには好きな名前を付けることができます。
3. クラスタが準備できたら、\[**Details (詳細)**] タブに移動して、**クラスタURL**と**APIキー**をメモします。

## レシピの実行

### リポジトリの複製

[Weaviateレシピリポジトリ](https://github.com/weaviate/recipes)を複製またはダウンロードします。

```bash theme={null}
git clone https://github.com/weaviate/recipes.git
```

Box統合フォルダに移動します。

```bash theme={null}
cd recipes/integrations/data-platforms/box
```

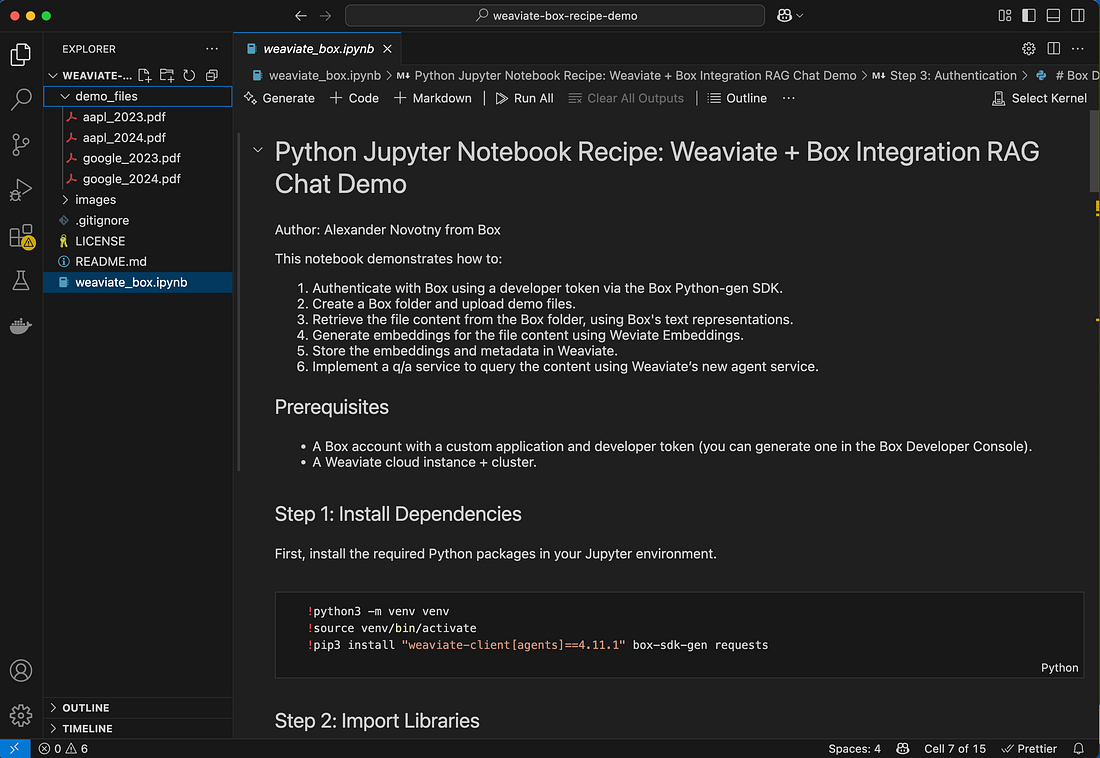
開発環境でJupyter Notebook (`weaviate_box.ipynb`) を開きます。

<Frame caption="The Box integration folder in the Weaviate recipes repository">
  <img src="https://mintcdn.com/box/nQi7jppEz_5O1YgH/images/ai/vector-databases/weaviate-repo-structure.png?fit=max&auto=format&n=nQi7jppEz_5O1YgH&q=85&s=64e1685ca7291d4489af517bebfe5b70" alt="Weaviateレシピリポジトリの構造" width="1100" height="758" data-path="images/ai/vector-databases/weaviate-repo-structure.png" />
</Frame>

### 認証の構成

ノートブックには、認証変数を設定する手順が含まれています。**手順3**のコードブロックを次の情報で更新します。

* 自分の**Box開発者トークン**
* 自分の**WeaviateクラスタURL**と**APIキー**
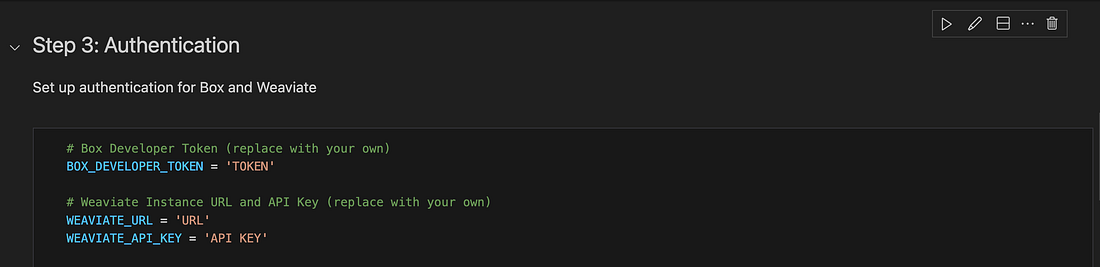
<Frame caption="Update the authentication variables in step 3 of the notebook">
  <img src="https://mintcdn.com/box/nQi7jppEz_5O1YgH/images/ai/vector-databases/weaviate-auth-variables.png?fit=max&auto=format&n=nQi7jppEz_5O1YgH&q=85&s=373758987f12f62172cbe2425ce61734" alt="ノートブックの認証変数" width="1100" height="267" data-path="images/ai/vector-databases/weaviate-auth-variables.png" />
</Frame>

### ノートブックの実行

ノートブックの各セルを順次実行します。ノートブックの実行内容は次のとおりです。

1. デモ用ファイルをBoxにアップロードします (または、自分が用意したファイルを使用します)。
2. Boxファイルからテキストコンテンツを抽出します。
3. テキストをチャンク分割し、Weaviateでベクトル埋め込みを作成します。
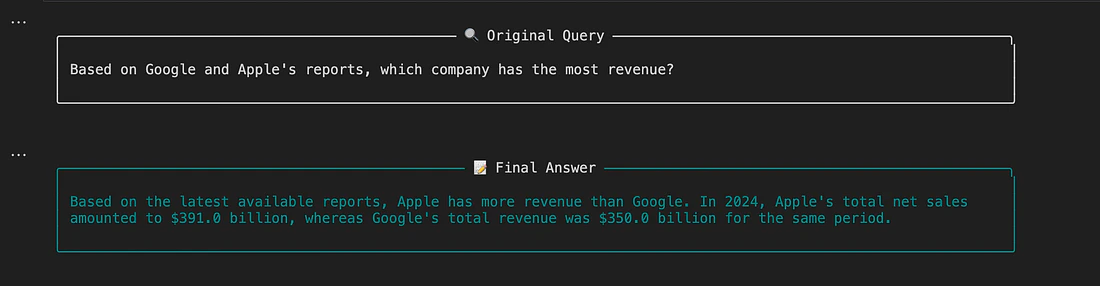
4. Weaviate Query Agentを使用して、コンテンツについての質問に回答します。
<Tip>
  リポジトリには、4つの10-K財務報告書が入った`demo_files`フォルダがテスト用に用意されています。別のコンテンツで作業したい場合は、これらを自分が所有するファイルに置き換えることができます。
</Tip>

最後のセルでは、デモとしてデータに対するクエリを実行します。**手順7**でクエリを変更して、自分のコンテンツに基づいて別の質問を行うこともできます。

<Frame caption="The Query Agent returns an answer based on your Box content">
  <img src="https://mintcdn.com/box/nQi7jppEz_5O1YgH/images/ai/vector-databases/weaviate-final-answer.png?fit=max&auto=format&n=nQi7jppEz_5O1YgH&q=85&s=8797fd9108430cf91ab04d468d1dee90" alt="Weaviate Query Agentからの最終的な回答" width="1100" height="286" data-path="images/ai/vector-databases/weaviate-final-answer.png" />
</Frame>

## 次の手順

<AccordionGroup>
  <Accordion title="データの拡張">
    年次報告書や記事、検索したい任意のドキュメントなど、追加のファイルをBoxにアップロードし、ノートブックを再実行してそれらのファイルをWeaviateに埋め込みます。
  </Accordion>

  <Accordion title="Query Agentのカスタマイズ">
    `system_prompt`パラメータを調整してエージェントの動作を変更します。たとえば、より詳細な分析や応答の具体的な形式をリクエストできます。
  </Accordion>

  <Accordion title="その他のWeaviateエージェントの確認">
    Weaviateは他の種類のエージェントも提供しています。[Transformation Agent](https://docs.weaviate.io/agents#transformation-agent)はデータを前処理することができ、[Personalization Agent](https://docs.weaviate.io/agents#personalization-agent)は個々のユーザーに合わせて応答をカスタマイズできます。
  </Accordion>
</AccordionGroup>

## リソース

<CardGroup cols={2}>
  <Card title="Weaviateレシピ" href="https://github.com/weaviate/recipes/tree/main/integrations/data-platforms/box" icon="github">
    Weaviateレシピリポジトリに含まれているフルバージョンのJupyter Notebook。
  </Card>

  <Card title="Weaviate Query Agent" href="https://weaviate.io/blog/weaviate-agents" icon="robot">
    Weaviateのエージェント型RAG機能について。
  </Card>

  <Card title="Weaviate Embeddings" href="https://weaviate.io/developers/wcs/embeddings" icon="brain">
    Weaviateの埋め込みサービスに関するドキュメント。
  </Card>

  <Card title="Box Developer Community" href="https://community.box.com/box-platform-5" icon="comments">
    フィードバックの共有や他のBox開発者からのサポート。
  </Card>
</CardGroup>

<RelatedLinks
  title="関連するリソース"
  items={[
{ label: translate("AI integrations"), href: "/ai/integrations", badge: "GUIDE" },
{ label: translate("Box and Pinecone"), href: "/ai/vector-databases/pinecone", badge: "GUIDE" },
{ label: translate("Get started with Box AI"), href: "/guides/box-ai/ai-tutorials/prerequisites", badge: "GUIDE" }
]}
/>
