> ## Documentation Index
> Fetch the complete documentation index at: https://developer.box.com/llms.txt
> Use this file to discover all available pages before exploring further.

# OAuth 2.0認証

export const SignupCTA = ({children}) => {
  return <div className="flex flex-wrap items-center gap-4 p-5 rounded-lg border border-gray-200 dark:border-gray-700 my-6" style={{
    background: "linear-gradient(135deg, rgba(0, 97, 213, 0.06), rgba(0, 97, 213, 0.02))"
  }}>
      <div className="flex-1 text-sm leading-relaxed text-gray-700 dark:text-gray-300" style={{
    minWidth: "280px"
  }}>
        {children}
      </div>
      <div className="flex flex-col items-center gap-2">
        <a href="https://account.box.com/signup/developer#ty9l3" className="signup-cta-button inline-flex items-center whitespace-nowrap px-5 py-2 text-sm font-semibold text-white no-underline">
          {translate("Get started for free")}
        </a>
        <a href="https://account.box.com/developers/console" className="signup-cta-login text-xs text-gray-500 dark:text-gray-400 no-underline whitespace-nowrap">
          {translate("Already have an account? Log in")}
        </a>
      </div>
    </div>;
};

export const MultiRelatedLinks = ({sections = []}) => {
  if (!sections || sections.length === 0) {
    return null;
  }
  return <div className="space-y-8">
      {sections.map((section, index) => <RelatedLinks key={index} title={section.title} items={section.items} />)}
    </div>;
};

export const RelatedLinks = ({title, items = []}) => {
  const getBadgeClass = badge => {
    if (!badge) return "badge-default";
    const badgeType = badge.toLowerCase().replace(/\s+/g, "-");
    return `badge-${badge === "ガイド" ? "guide" : badgeType}`;
  };
  if (!items || items.length === 0) {
    return null;
  }
  return <div className="my-8">
      {}
      <h3 className="text-sm font-bold uppercase tracking-wider mb-4">{title}</h3>

      {}
      <div className="flex flex-col gap-3">
        {items.map((item, index) => <a key={index} href={item.href} className="py-2 px-3 rounded related_link hover:bg-[#f2f2f2] dark:hover:bg-[#111827] flex items-center gap-3 group no-underline hover:no-underline border-b-0">
            {}
            <span className={`px-2 py-1 rounded-full text-xs font-semibold uppercase tracking-wide flex-shrink-0 ${getBadgeClass(item.badge)}`}>
              {item.badge}
            </span>

            {}
            <span className="text-base">{item.label}</span>
          </a>)}
      </div>
    </div>;
};

<RelatedLinks
  title="必須のガイド"
  items={[
{ label: translate("Select Auth Method"), href: "/guides/authentication/select", badge: "GUIDE" }
]}
/>

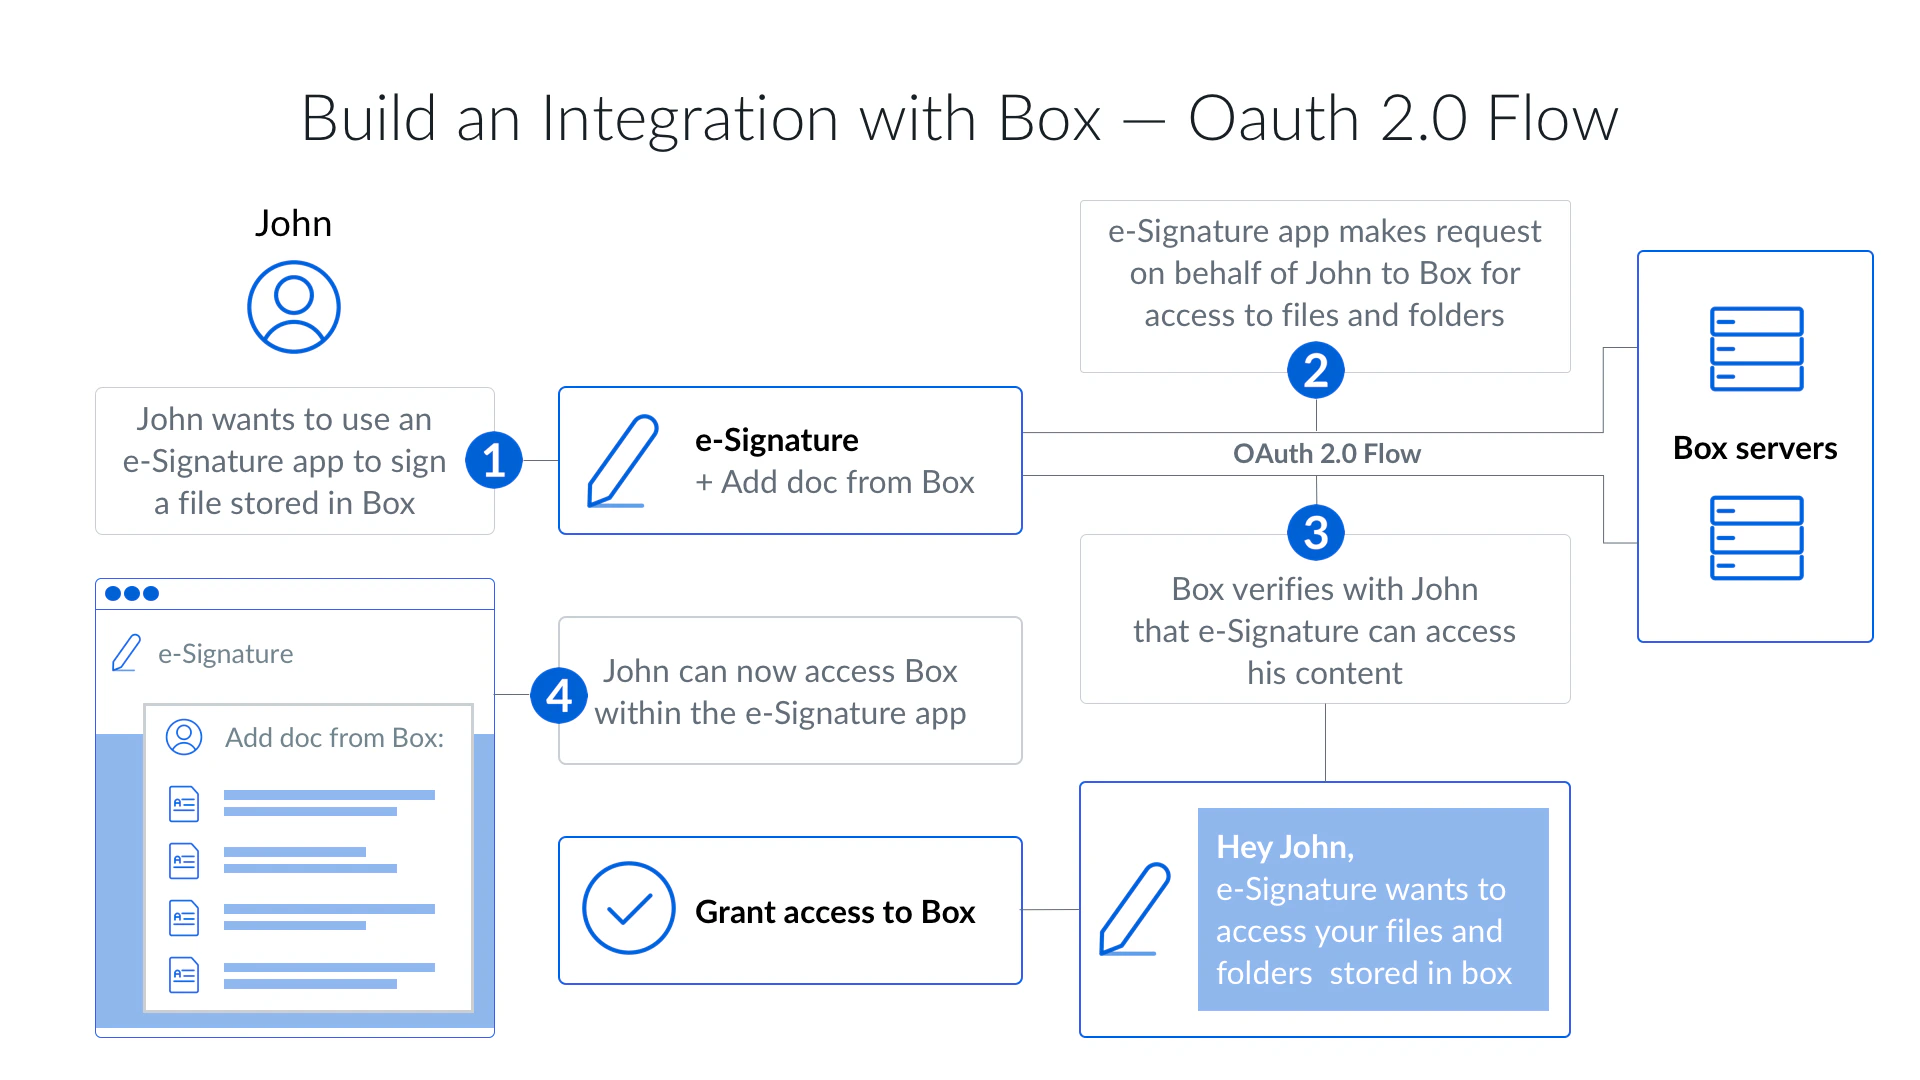
クライアント側OAuth 2.0は、Box APIに対してユーザーを認証する最も簡単な方法の1つです。これは、ユーザーがアプリケーションから他のアプリケーションにある自分のデータにアクセスできるようにすることを目的とした[オープンスタンダード](https://oauth.net/2/)です。

Twitter、Facebook、またはGoogleを使用してウェブサイトにログインしたことがあれば、OAuth 2.0を使用したことがあると考えられます。
<Frame border>
  <img src="https://mintcdn.com/box/qMvmrptl_56Hug64/ja/guides/authentication/oauth2/oauth2-flow.png?fit=max&auto=format&n=qMvmrptl_56Hug64&q=85&s=f2b294f0f0f85e0f1f3fdcc715d099c1" alt="OAuth 2.0フロー" width="1920" height="1080" data-path="ja/guides/authentication/oauth2/oauth2-flow.png" />
</Frame>

Boxでのクライアント側認証にも同様のフローがあります。このフローでは、ユーザーは、アプリケーションからBoxウェブアプリにリダイレクトされて、ログインするように求められ、アプリケーションに対してユーザーのデータへのアクセス権限を付与します。

## OAuth 2.0を使用する場合

クライアント側認証は、以下に当てはまるアプリに最適な認証方法です。

* 既存のBoxアカウントを持っているユーザーを使用する
* ユーザーにBoxを使用していることを知らせる必要がある
* ユーザーのBoxアカウントにデータを保存し、アプリケーションのBoxアカウントには保存しない

<SignupCTA>
  無料のDeveloperアカウントを作成すると、開発者コンソールにアクセスし、OAuth 2.0アプリケーションを作成してユーザーの認証を数分で開始できます。
</SignupCTA>

<RelatedLinks
  title="関連するガイド"
  items={[
{ label: translate("Platform Apps"), href: "/guides/applications/platform-apps/index", badge: "GUIDE" }
]}
/>
