> ## Documentation Index
> Fetch the complete documentation index at: https://developer.box.com/llms.txt
> Use this file to discover all available pages before exploring further.

# OAuth 2.0を使用した設定

export const SignupCTA = ({children}) => {
  return <div className="flex flex-wrap items-center gap-4 p-5 rounded-lg border border-gray-200 dark:border-gray-700 my-6" style={{
    background: "linear-gradient(135deg, rgba(0, 97, 213, 0.06), rgba(0, 97, 213, 0.02))"
  }}>
      <div className="flex-1 text-sm leading-relaxed text-gray-700 dark:text-gray-300" style={{
    minWidth: "280px"
  }}>
        {children}
      </div>
      <div className="flex flex-col items-center gap-2">
        <a href="https://account.box.com/signup/developer#ty9l3" className="signup-cta-button inline-flex items-center whitespace-nowrap px-5 py-2 text-sm font-semibold text-white no-underline">
          {translate("Get started for free")}
        </a>
        <a href="https://account.box.com/developers/console" className="signup-cta-login text-xs text-gray-500 dark:text-gray-400 no-underline whitespace-nowrap">
          {translate("Already have an account? Log in")}
        </a>
      </div>
    </div>;
};

export const MultiRelatedLinks = ({sections = []}) => {
  if (!sections || sections.length === 0) {
    return null;
  }
  return <div className="space-y-8">
      {sections.map((section, index) => <RelatedLinks key={index} title={section.title} items={section.items} />)}
    </div>;
};

export const RelatedLinks = ({title, items = []}) => {
  const getBadgeClass = badge => {
    if (!badge) return "badge-default";
    const badgeType = badge.toLowerCase().replace(/\s+/g, "-");
    return `badge-${badge === "ガイド" ? "guide" : badgeType}`;
  };
  if (!items || items.length === 0) {
    return null;
  }
  return <div className="my-8">
      {}
      <h3 className="text-sm font-bold uppercase tracking-wider mb-4">{title}</h3>

      {}
      <div className="flex flex-col gap-3">
        {items.map((item, index) => <a key={index} href={item.href} className="py-2 px-3 rounded related_link hover:bg-[#f2f2f2] dark:hover:bg-[#111827] flex items-center gap-3 group no-underline hover:no-underline border-b-0">
            {}
            <span className={`px-2 py-1 rounded-full text-xs font-semibold uppercase tracking-wide flex-shrink-0 ${getBadgeClass(item.badge)}`}>
              {item.badge}
            </span>

            {}
            <span className="text-base">{item.label}</span>
          </a>)}
      </div>
    </div>;
};

export const Link = ({href, children, className, ...props}) => {
  const localizedHref = localizeLink(href);
  return <a href={localizedHref} className={className} {...props}>
      {children}
    </a>;
};

<RelatedLinks
  title="必須のガイド"
  items={[
{ label: translate("Select Auth Method"), href: "/guides/authentication/select", badge: "GUIDE" },
{ label: translate("Platform App"), href: "/guides/applications/platform-apps/index", badge: "GUIDE" }
]}
/>

Platformアプリは、クライアント側の<Link href="/guides/authentication/oauth2">OAuth 2.0</Link>認証を使用するよう設定できます。

<Card href={localizeLink("/guides/authentication/oauth2")} arrow title="OAuth 2.0認証のしくみを確認する" />

## 前提条件

OAuth 2.0認証を使用してPlatformアプリを設定するには、Box Enterpriseアカウントから[開発者コンソール][devconsole]にアクセスできることを確認する必要があります。または、[Developerアカウント][devaccount]にサインアップすることもできます。

<SignupCTA>
  Boxアカウントをまだ持っていない場合は、無料のDeveloperアカウントを作成すると、開発者コンソールにアクセスして、OAuth 2.0アプリケーションの作成と構成を行うことができます。
</SignupCTA>

## アプリの作成手順

### 開発者コンソールへの移動

Boxにログインし、[開発者コンソール][devconsole]に移動します。\[**Platformアプリ**] を選択し、\[**新規アプリ**] をクリックします。

### アプリの新規作成

\[**アプリの新規作成**] 画面で、アプリ名を入力し、\[**アプリの種類**] ドロップダウンから \[**OAuth 2.0**] を選択します。

<Frame border>
  <img src="https://mintcdn.com/box/J0IlfoFf_v0hLHOU/images/guides/authentication/create-new-app.png?fit=max&auto=format&n=J0IlfoFf_v0hLHOU&q=85&s=e1118ea7200b15165c48f314ea4e9d0f" alt="[アプリの新規作成] 画面" width="1024" height="891" data-path="images/guides/authentication/create-new-app.png" />
</Frame>

<Warning>
  選択すると、新しいアプリケーションを作成しない限り、別の認証方法に変更できません。
</Warning>

## 基本的な構成

アプリケーションを使用するには、事前にいくつかの追加構成が必要になります。

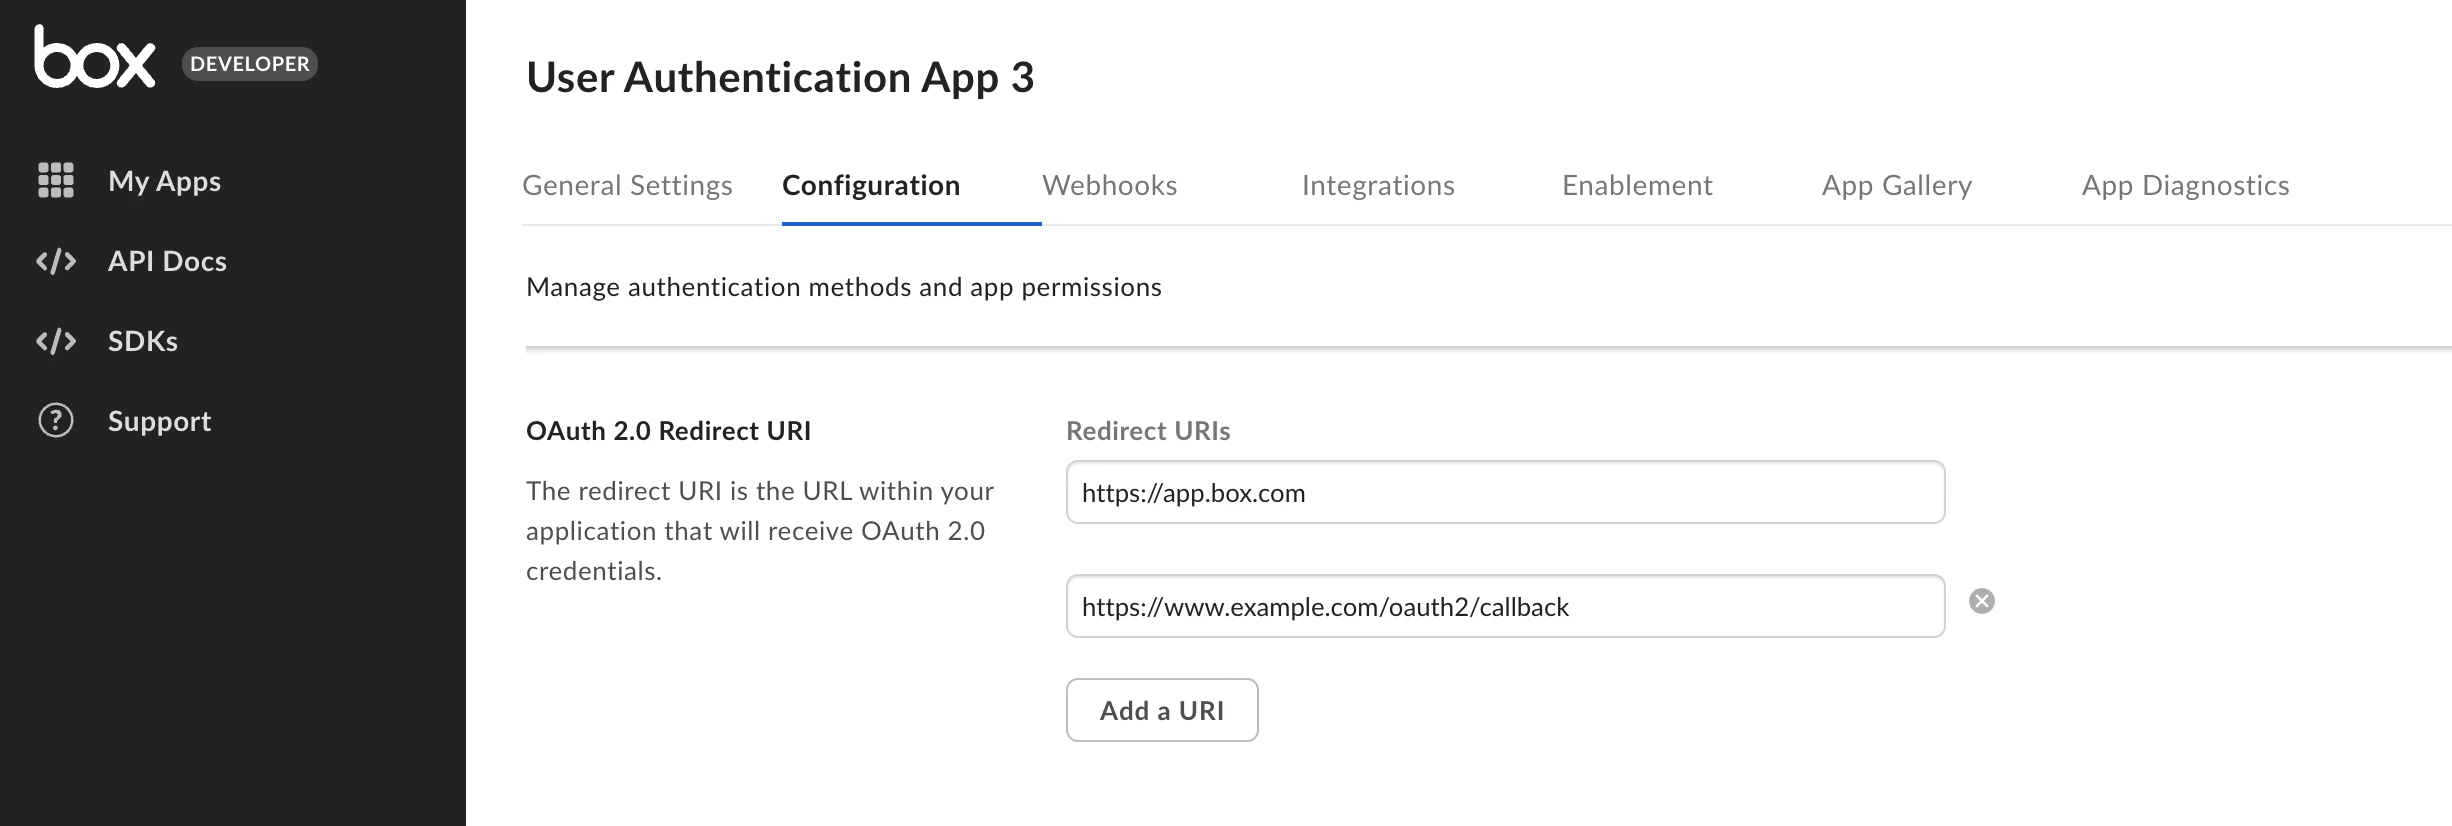
### リダイレクトURI

OAuth 2.0フローの間、ユーザーは、認証のためにブラウザにリダイレクトされた後、アプリケーションが自分の代わりにアクションを実行することを承認します。

Boxでは、ユーザーをリダイレクトする前に、<Link href="/reference/get-authorize/#param-redirect_uri">承認URL</Link>に渡された`redirect_uri`パラメータが、アプリケーションに構成されたリダイレクトURIのいずれかと一致することを確認します。完全に一致しているかどうかがチェックされるため、URIはまったく同じである必要があります。localhostおよびループバックアドレスのリダイレクトURIは、どのポートへのリダイレクトも許可されますが、スキーム、ドメイン、パス、およびクエリパラメータは、構成されているURIのいずれかと一致する必要があります。

これらのURIは、開発者コンソールの \[構成] ページにある \[OAuth 2.0リダイレクトURI] セクションで設定できます。有効なHTTPS URIまたは安全性の低いHTTP URI (localhostまたはループバックアドレスの場合) である必要があります。重複するURIの保存は許可されていません。

<Warning>
  日本時間2021年11月30日以降、OAuth 2.0を使用する新規のアプリケーションでは、開発者コンソールの \[構成] タブで設定されたURIとリダイレクト時に使用されるURIが厳密に一致する必要があります。また、そのため新規のアプリケーションと既存のアプリケーションの両方で、複数のリダイレクトURIを追加できるようになります。

  アプリケーション用にリダイレクトURIを複数設定した場合、承認URLには、開発者コンソールで設定したURIのいずれかと一致する`redirect_uri`パラメータを含める必要があります。このパラメータが指定されていない場合、ユーザーがアプリケーションにアクセス権限を付与すると、`redirect_uri_missing`エラーが表示され、アプリにリダイレクトされません。

  既存のアプリケーションでは、サービスの中断を回避するために、日本時間2022年5月14日までにこのURLを変更する必要があります。
</Warning>

<Frame border width="600" center>
  <img src="https://mintcdn.com/box/KBEcg4yicgc_HMRY/images/guides/authentication/app-redirect-uri-3.png?fit=max&auto=format&n=KBEcg4yicgc_HMRY&q=85&s=7c467d44b0056cee68c0c2bb82b3c57c" alt="アプリ名のフォーム" width="2452" height="826" data-path="images/guides/authentication/app-redirect-uri-3.png" />
</Frame>

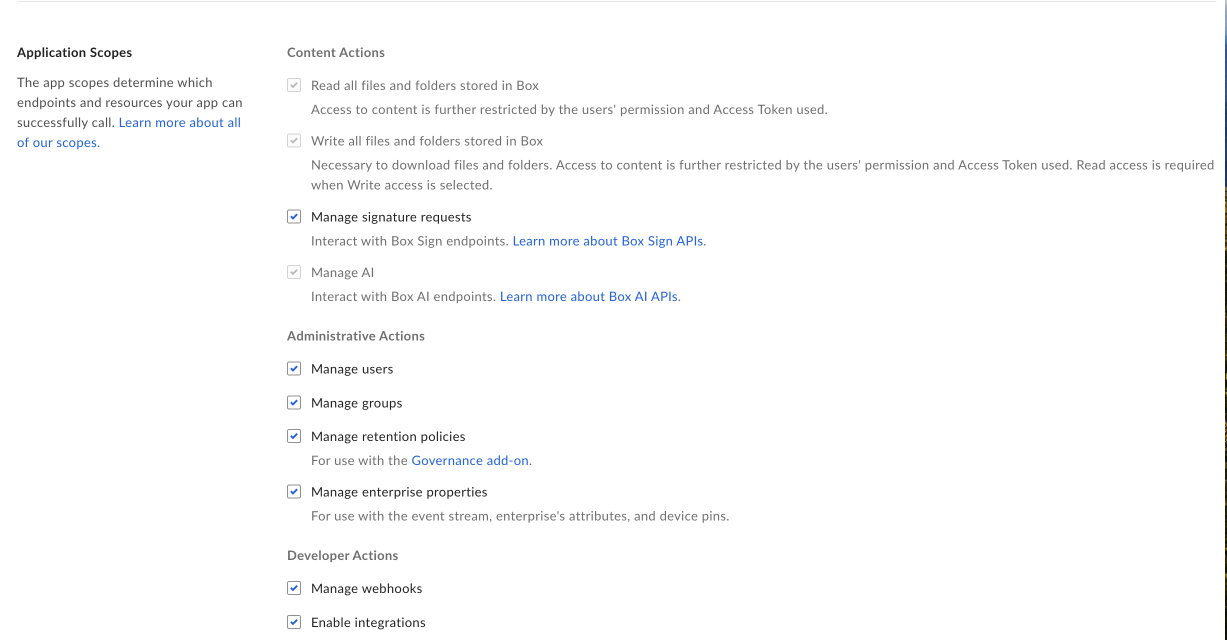
### アプリケーションスコープ

スコープを使用して、アプリケーションがデータにアクセスするために必要な権限を定義します。各オプションの詳細については、<Link href="/guides/api-calls/permissions-and-errors/scopes">スコープのガイド</Link>を参照してください。

<Frame>
  <img src="https://mintcdn.com/box/KBEcg4yicgc_HMRY/images/guides/authentication/app-scopes.png?fit=max&auto=format&n=KBEcg4yicgc_HMRY&q=85&s=7d6a76fe395fc483d33179f6c4ad34e1" alt="アプリ名のフォーム" width="1227" height="640" data-path="images/guides/authentication/app-scopes.png" />
</Frame>

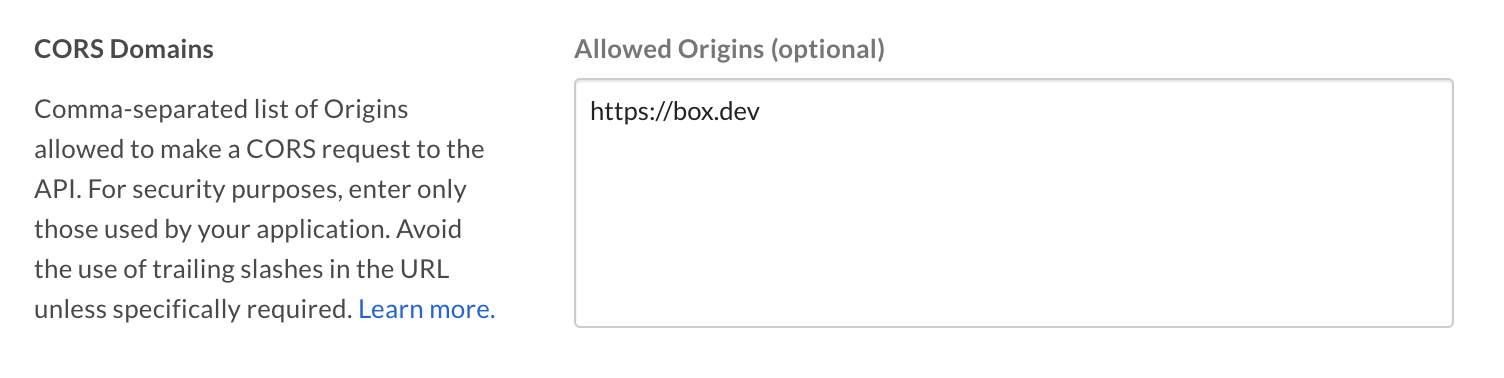
### CORSドメイン

アプリケーションがJavaScriptでフロントエンドのブラウザコードからAPIコールを実行する場合は、[クロスオリジンリソース共有][cors] (CORS) のために、これらの呼び出しの実行元となるドメインを許可リストに追加する必要があります。すべてのリクエストがサーバー側のコードから発行される場合は、このセクションをスキップできます。

許可リストにすべてのURIを追加するには、[開発者コンソール][devconsole]の \[**構成**] タブの下部にある \[**CORSドメイン**] セクションに移動します。
<Frame>
  <img src="https://mintcdn.com/box/KBEcg4yicgc_HMRY/images/guides/authentication/app-cors.png?fit=max&auto=format&n=KBEcg4yicgc_HMRY&q=85&s=12de7f8cec95dc4317b02172ef10e9df" alt="アプリ名のフォーム" width="1504" height="378" data-path="images/guides/authentication/app-cors.png" />
</Frame>

[devconsole]: https://app.box.com/developers/console

[devaccount]: https://account.box.com/signup/n/developer

[devtoken]: /guides/authentication/tokens/developer-tokens

[cors]: https://en.wikipedia.org/wiki/Cross-origin_resource_sharing

<RelatedLinks
  title="関連するガイド"
  items={[
{ label: translate("Select Auth Method"), href: "/guides/authentication/select", badge: "GUIDE" },
{ label: translate("Setup with OAuth 2.0"), href: "/guides/authentication/oauth2/oauth2-setup", badge: "GUIDE" }
]}
/>